Friday, August 31, 2012

Once upon a time in Germany

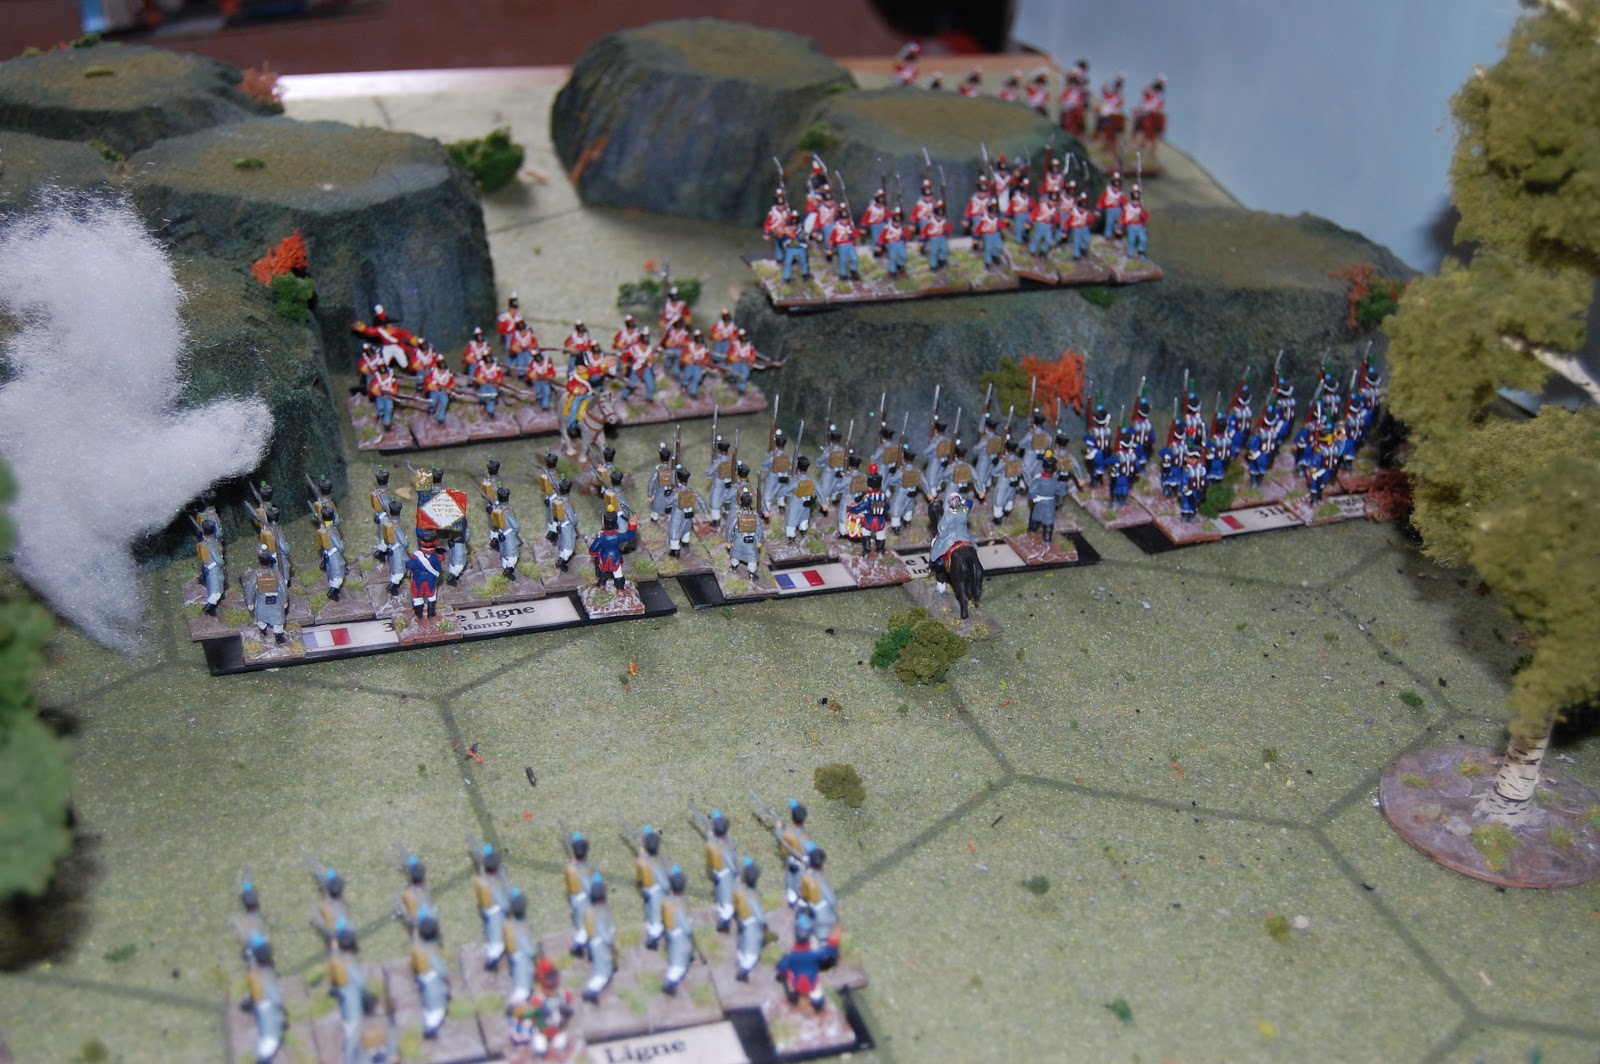
 Somewhere in Germany 1984 - The Soviet OP is in the ruined building. 
The cars represent outbuildings. The British advance from north and south.

Capability Savage & Tootsie Royale paid a call last night as did Donogh.  Mrs Kinch was delighted to see someone who wasn't me and whose first name wasn't nurse. She, Tootsie and Mrs Kinch major retired to the front room with a CD player full of show tunes, some cats and several bottles of white wine, while we repaired to the War Room.

I've been collecting Elheim Cold War Figures for a while now and it was finally time for them to see some action. The rules were Force on Force ably umpired by Donogh. We used the Top Malo House scenario from the basic rulebook, but with Soviets substituted for Argentineans.

Once upon a time in Germany, circa 1984:

The BAOR are conducting their traditional heroic retreat (Agincourt, Corunna, Mons, Dunkirk et al) while buying time for Reforger to arrive. Captain Mikhail Savageski of the 33rd Soviet Motor Rifle Division has led a platoon of Razvedcheki to an abandoned house over looking a major road in the hopes of calling in artillery on the retreating capitalists.

Captain "Rupert" John Anthony Cunningham-Howard of the Irish Guards has spotted the Soviet OP and decided to clear it out. However, the Soviets have already gathered valuable intelligence and if they manage to get away it will imperil the retreat.  The Guards must clear the OP out and pronto.

The victory points for this scenario, the Soviet player recieves a point for every kill or serious casualty he inflicts, while the British player gains three points for driving the Soviets out of the building and five if he manages to kill or capture EVERY Soviet soldier.


 The Soviet scouts crammed in to the OP

The building was a prepainted resin job I picked up some years ago. I believe it's produced by Conflix. I think it's actually a rather good fit for Second World War or Modern scenarios. 


 The British assault group, please forgive the poor camera phone pictures

This unit is made up of three groups, the good Captain, his radio man Corporal Dornan and his trusty M79 toting batman Private Gorman. They are hiding behind the hill. The chaps on top are the gun group with a GPMG, another M79 and some SLRs, while the lads on the left are armed with SLRs and another M79.

I placed these chaps on overwatch hoping preempt any retaliatory fire from the Soviets. My plan was to close, rocket the building until it collapsed and try to flank the building while the Soviets tried to flee.


 The Support Group from the south crest the hill and 
let rip with their GPMG and 66mm LAW rockets. 

The explosions down two Soviet soldiers, but the return fire from the building was crushing. 


 The entire group go down in the fusilade, I had hoped that the unit on overwatch might prevent this, but I blew my roll and was only allowed one round of fire before coming off overwatch.

 My fire managed to knock over a number of the defenders, but with friendly troops able to render aid, there was no telling how many of those men were injured, dead or just suppressed. The building withstood the shock of the LAW impacts this time, but it was looking shakier than it had.


 My first aid was relatively poor, three Guardsmen down with serious wounds, while the GPMG gunner managed to man his weapon. Things were looking distinctly sticky for the British. Corporal Dornan radio'd for medical assistance. Inside the house, things were looking slightly better for the Soviets as several of their men were just stunned by the concussion, though two of the fellows in the northern part of the house were seriously wounded.


 Placing the gun group on overwatch, I sent the maneuvre group around to the north to flank the Soviets. They opened up on the running men, unsuccessfully, but rather did rather better when the  the support group (the chaps to the south) attempted to suppress them. 


 The Soviet fire was remorseless and the three remaining men of the support group went down. Only the GPMG gunner remained. The British fire had failed to kill the Soviets, but the LAW fire was beginning to have an effect on the shell of the building. Captain Savageski was quickly realising that it wouldn't take much more of this. With that in mind and with three victory points already in the bag for causing three serious wounds, he decided to focus on getting some of his men off the board. This would prevent me from wiping out his entire force, which would leave me hoping for a draw at best.


 When then decisive moment comes, you need a chap who has been to the right sort of school. I managed to move up Captain Rupert command section up and he, Dornan and Gorman laid all about them with SLR and M79. The resulting torrent of fire knocked the Soviets down like nine-pins. One could only hope they were hit and were not simply shamming...


 It was not looking good for the Soviets as none of the fallen men were able to get up. Unfortunately, my first aid rolls were equally poor and two of the chaps from the support group looked like they'd copped blighty ones. This took me to five casualties and gave the Soviets five points. I would gain three points as soon as they vacated the building, but it didn't look like it was going to be enough.


 Captain Savageski bolted from the building leading a few desperate survivors in a mad charge to reach the cover of the cars. The sole unwounded man in the support group opened up with his GPMG, but was severely wounded by return fire.


With a crash the building started to collapse, killing the Soviet wounded trapped inside. The howls from within rebuked Captain Savageski for abandoning his men, but he steeled his heart - knowing that the information he had about troop movement was of more worth to the Rodina. 


Captain Savageski's men leap up from behind the scattered cars and make a run for board edge. Captain Rupert and chums prepare to fill them with lead. If this round of fire down the Soviets or pins them, they will lose the game. If any of the Soviets make it off the board, Captain Rupert will have the satisfaction of holding the field and driving them off, but at an unacceptably high cost. 


 We roll off and the Soviets make it. The Razvedcheki run from the field before the British fire can take effect, leaving behind a burning building and a dozen of their comrades, but with the information required by HQ.


Counting the cost

Captain Rupert is left to organise medical attention and evacuation for the wounded. The butchers bill for this small house was too dear a price to pay. But next time Savageski, next time.

It was fun to finally get a game in with my Cold War forces, though there were some last minute substitutions when I discovered I didn't actually have everything I needed. Thanks to Donogh for extemporising the game out of what we had available and congratulations to Savage on a solid win. One earned by rigorous maintenance of aim.

But Captain Rupert and the Irish Guards will march again...

Wednesday, August 29, 2012

There is good news & bad news


 Once more I must submit to the tyranny of trousers

Gentlemen, there is good news and there is bad news. The bad news is, sadly that no more may I wander trouserless and free around my own home. Gone are the days of eating sandwiches for three meals a day and leaving clothes on the floor if you felt like it. The pleasent memory of returning home from work to watch "The Dambusters" and "Coriolanus" while painting a Dutch musketeer is in the past now. 

Roll up that dressing gown Kinch, it shall not be wanted these ten weeks. 


Huzzah!

On the other hand, there is very, very good news (which is not unrelated to the bad). Mrs Kinch is well, has stopped leaking CSF from her spine and is home again. We have so many pills scattered around the house that I fear the Drugs unit may come crashing through the door at any moment. It's great to have her back, domestic tyranny notwithstanding. 

Mrs Kinch also asked to thank you all for your very kind comments, prayers and best wishes. I forwarded them to her email while she was in hospital, so that she got a little crop of them every morning.

In other news, I finally managed to get threaded comments to work. Very happy with this, though it did require me to struggle like a monkey with blogger for twenty minutes. 


Archeaology of an plastic Sherman


Portrait of the artist as a Young Sherman

We've been in Chez Kinch for quite a while now - so long in fact that I thought it was time to finally unpack some of the boxes we've been toting around for so long. Some of these were packed two house moves ago I think if not before.

When I had a regular Thursday game, we usually played Memoir '44 either with the plastic figures that came with the box or 1/300 scale figures. I've been playing more Memoir '44 recently, mainly because I think it's a good game and I enjoy it and also because I don't want to flog Napoleonics to death.

A change being as good as a holiday and all that. With that in mind, I've set myself the task of running up some forces for Memoir '44 in 1/72.  But before I start buying kit I think I shall see what I have packed away. 


This doesn't look like an Airfix Sherman to me - damned if I know who made it

I genuinely don't remember painting these models - though I'm relatively sure that they belong to my second period of wargaming, when I played a great deal of Warhammer Panzer Battle by Phil Yeats. I attended a club at the time and it was dominated by fantasy and science fiction gamers, so I played what was available. I was around twenty and to be honest, my research mainly consisted of looking at what the model shop had in stock and painting them according to the back of the box. Occasionally, I would have a rush of blood to the head and paint up something from a movie. I did do Mark Hamill and Lee Marvin from The Big Red One.

There was an American army which was painted entirely with Goblin Green covered by Ork Flesh wash. They fought a seemingly endless series of late war German armies replete with Tigers and Panthers, though they also did some service against a Soviet army that posed as Koreans when the mood took us. 


I presume this was for Tunisia, another kit I have no recollection of painting or assembling

It remains to be seen whether anything can be done with these kits. I'm not even sure if they're 1/72 or 1/76. If I recall correctly, the Airfix sherman had a thinner gun barrel, so they are probably not Airfix. I think I remember using the Grant during an Operation Torch scenario pitting American Rangers against Vichy French. My opponent had a rare and extremely dangerous Char B1 which did considerable execution.


Decals were something that happened to other people

It's been fun digging up these relics of a previous era - though I must say I enjoy my wargaming rather more now than I did then. I think it's a combination of having a wargames room, simpler rules and more time spent playing games.

Still, there may be life in these old dogs yet. They will definately need a repaint and possibly some rebuilding, once I puzzle out what they are exactly.


- Posted using BlogPress from my iPhone

Monday, August 27, 2012

Busaco (Reyniers Assault) - 27th September 1810 - Part Two


The French right, where the Irishmen of the 4th Royal Irish Dragoon Guards have forced my volitgeurs in square, damn their eyes


When last we saw the French army, things were not looking good for Brother John. Les Roastbifs had planted themselves on a hill and we had been obliged to hurl ourselves at it. Now in actuality, the French did do that, but did not strike the British position straight on. This allowed the British line to shoot up the French columns for rather longer than would have been the case. Unfortunately this is only really possible when the French are in some doubt as to where the British position is. Given arms that remain stubbornly 33 inches long, there is no real point in playing a game where half the board is unused - I would need a bigger board and a bigger house.

One would have thought that hundreds of years of folk memory would have put the Frenchers off attacking British troops in positions of their own choosing. It took them two generations, if not more, to figure it out in the Hundred Years War - would I be able to turn the situation around.


The Halberdiers go down fighting

If you remember from the first half of this report, I had skirmished with my cavalry on my left, hoping to punish the vulnerable Portuguese infantry on the heights, refused the centre and placed all my hopes on a victory of my right flank. My infantry had managed to make a dent in the British line, but the inevitable counterattack had done considerable execution. I still had several battalions in hand and time would tell whether they would be sufficient.


The absolutely crushing volley from the 31ieme Legere that did for the Halberdiers.

As you can see, the Legere did some damn fine shooting, but of the four battalions I had, one was so whipped as to be almost useless, the Voltigeurs were in square and being harried by cavalry. So while it was good to have bundled the Halberdiers out of the way, I was not feeling as confident as all that.

The 22ieme Ligne try to shift the 57th off the ridge

They fail to do so (i.e. their melee attack does some damage, but doesn't force the 57th to retreat or wipe them out) and they bogged down in a close range volleying match. Meanwhile the 4th Royal Irish Dragoon Guards move forward to threaten by weakened battalion and pin the Voltigeurs in square again. Damn.
The 15ieme Dragoons move forward finally, throwing the 7th Portuguese line into square.

I had hoped that this would have been my opening gambit, but Du Gourmand forestalled me by cunning use of a Short of Supply card. With three infantry units on this side of the table, it was entirely possible that I could either wipe one or two of them out if he refused to form square or I could pin all three, severely limiting his ability to maneuvre.
The Dragoons make short work of my weakened battalion and thunder into the sharp shooting 31ieme Ligne

It was looking like the wheels were about to come off the cart on the right flank. I just could not seem to injure those damned Irish dragoons.
The Chasseurs move up to serve the Portuguese infantry in their turn

This was what had been hoping for and I was finally able to do it. I was unlikely unless I was very unlucky that Du Gourmand's Portuguse infantry would be able to deal with my cavalry once I had them all pinned in square. This would take three cards from his hand and leave him scrabbling for a response when I got my centre and right moving.
Victory?

And this is where it got interesting. Du Gourmand didn't form square with the second infantry battalion who were promptly ridden down by the Chasseurs. This was a puzzlement as Du Gourmand must of have known it was the likely outcome and he would be be unlikely to surrender a unit lightly. The only explanation could be that he had drawn a very good card which he didn't want to risk losing.

That did not bode well.
Meanwhile, I finally got my centre moving, hopefully to give the Portuguese 
infantry hiding in the village the boot
So, what did Du Gourmand have up his sleeve?

With tragic inevitability, he threw down Bayonet Charge! This was very bad news for me as I had to battalions in square on my right. They were safe when all that could hit them was the Irish dragoons, but things soon changed as the British infantry came into play.
The Second Battalion 7th Portuguese surround my gallant Frenchmen while
 the 57th hit them in the front.


My column in the centre was getting so close....

The rolling platoon volleys begin to crash down the line and it's all over.
The Fourth Foot watch through the roiling gunsmoke as the French 
infantry break and run for the rear. 

General Du Gourmand - magnanimous in victory as always

On the whole, I was happy with the game. It played out rather like the real battle went, French columns reaching for British lines and not quite making it. In retrospect, in view of the lack of British artillery in the centre, I should have formed up my troops there so that when the assault on the right came, they would be in a position to support them. As it was, the British were able to concentrate their men and defeat the attack in detail.


Saturday, August 25, 2012

Update


A few days ago, Capability Savage and I met for a quiet one - while we were in yonder hostelry, the bridge decided to the turn and allow a three masted sailing vessel up the Liffey. The light was awful, but I did the best I could with my phone.
In the meantime, I've been working away on my Dutch musketeer. This has been a slow process, particularly choosing colours that didn't look out of place, but also went well together. Slow, but steady I think is the watch word here. 


To be honest, I haven't been up to much in the hobby line of late as Mrs Kinch is in hospital. We had hoped that she would be home the day before yesterday, but that sadly wasn't possible. She is being very well looked after and is receiving the best of care, unfortunately there have been some post surgery complications which we are hoping will clear themselves up in the next day or two.

Until then, all I do really is visit, hope and pray.


- Posted using BlogPress from my iPhone

Thursday, August 23, 2012

Busaco (Reyniers Assault) - 27th September 1810 - Part One


I've written about the Battle of Busaco before, but for those you without photographic memories.

"The Battle of Busaco is not one of those Napoleonic battles that live in my imagination particularly. I have no strong feelings about, it lacks the resonance of Waterloo, the romance of Assaye, the miniature quality of Maida or the piractical flair of Vittoria. I shall give the barest of outlines and then get down to the meat of the matter. 

It is in some ways the stereotypical Peninsula battle, the British are on the defensive and deploy the majority of their force in a reverse slope defence, which was then assaulted by the French. But I am getting ahead of myself and falling into that newspapermans trick of telling the end or at least the middle of the story at the beginning. The strategic situation is as follows; it is 1810 and the French hold Spain more or less. Wellington has retreated from Spain into Portugal, where the French have far more limited options as to how they may approach. Napoleon ordered Massena, the French commander, to drive Wellington out of Portugal. This makes sense if you imagine that Spain is a square, while Portugal is a smaller square in the bottom left hand corner, the edges of which are made up of the sea and mountains. Without these mountains, there is every possibility that Portugal would simply have ended up as more Spain. 

The French advance and take after siege several forts along the border and then begin to march on Lisbon. Wellington picks a position, Busaco ridge, and meets the French upon it. The French are unable to properly scout the position or establish where the British troops are concentrated. They launch an attack in the centre under Reynier thinking they are hitting the flank of the British position. They become heavily engaged and are beaten back. Ney on the French right, hears this and believing that his comrades are winning launches another attack which is driven off in turn with a volley and a  bayonet charge. 

The French then withdrew to their original positions and proceeded to attempt a flank march, while Wellington fell back towards the Lines of Torres Vedras, a huge line of fortifications."

The battle we're talking about here is Reyniers assault which opened the battle.


General Du Gourmand surveys the scene

I was in an uncharacteristically generous mood and decided to allow General Du Gourmand to play the British for a change as I'd made him play the baddies the last few times we'd played. I knew that I would have to play aggressively to win in this scenario, but thought that my best course of action would be trying to focus on the weaker Portuguese units. I also hoped to use my cavalry superiority to hamper his ability to manoeuvre.


With that in mind, I sent a squadron of Dragoons and one of Chasseurs splashing though the river in order to threaten the isolated Portuguese brigades on the British right.


Du Gourmand countered by pushing his artillery and light infantry forward on his left, ready to light up my troops as soon as they closed.

None daunted, my brave lads carried on...

...while Du Gourmands redcoats held their fire.

My rivers prove again that they are not to be trusted as they come apart while the Dragoons take up residence in the Bodega


The Royal Horse Artillery start to shell the advancing French columns...

...but swiftly run out of ammunition (are effected by a Short of Supplies card) and have to return to the baseline to "bomb up".


Sadly, General Du Gourmand serves me in my turn and due to a botched order the Dragoons are sent packing.

The view from the British left, steady boys.

The Portuguese on the British right breath a sigh of relief as the Dragoons disappear back over the river. The Chasseurs retire to the Bodega, there was obviously something good in there...

Vive l'Empereur! 

I throw my French battalions forward, taking a double move with a Bayonet Charge card. This move would make or break my plan, if it succeeded there was every liklihood that General Du Gourmand would be unable to muster a suitable response.
Success! 

But at what a cost, I wiped out two British battalions, but the battle backs left one of my units very vulnerable. It was good, but would it be good enough?


The French "break in" further into the British position, driving back, but not wiping out the Fourth Foot. Meanwhile the 4th Dragoon Guard hover menacingly on the other side of the hill.


The British counter-attack when it came was brutal. 

I'd advanced my light infantry into the cottage in the foreground, where they were shot by the Portuguese and then charged by the Connaught Rangers. The Rangers didn't manage to evict them and were bogged down, trading volleys, but elsewhere General Du Gourmand managed to extract his weakened units before I got to them and hit my advanced battalion, the 8ieme Ligne I think, causing some casualties. 
I failed to make much headway in my turn, whereupon General Du Gourmand visions of Knighthoods dancing before him, set to work dismantling my attack. Where the Irishmen of the  Connaught Rangers had failed, the mongrels of the Kings Royal Halberdiers succeeded. The second battalion 8ieme Ligne was broken and the first battalion taken in the rear.

To add insult to injurty the Fourth Royal Dragoon Guards had decided to join us and were now threatening the 31ieme Legere.

All in all it was looking rather grim for Johnny Frenchman.